
Hey everyone, it’s your favorite tech expert back with another in-depth look! Today, we’re going to talk about something that scares even the most experienced computer users: losing important files. It doesn’t matter if you accidentally hit the delete key, a software bug, or a sudden system crash; it’s never fun to lose your important documents, photos, or videos.
But don’t worry! In most cases, the files that were “deleted” aren’t really gone for good; they’re just waiting to be found. This complete guide will show you step by step how to recover deleted files on both Windows and Mac computers. We’ll talk about different ways to get your lost data back, from the easy built-in tools to more complicated recovery software. This way, you’ll have the information and tools you need.
We will mainly talk about how to recover deleted files on Windows 10 and Mac, but a lot of the ideas and tools we talk about will also work for recovering deleted files on Windows 11. This is like a digital first-aid kit for lost data!
Knowing What Happens When You Delete a File
Before we talk about how to recover files, it’s important to know what really happens when you delete one. Many people think that deleting a file right away removes its data from your hard drive or SSD. The operating system doesn’t do anything else; it just deletes the pointer that tells it where that file is. The file’s space is then marked as “available” for new data to write over it.
Think of it like a list of books in a library. When you delete a file, it’s like taking a book out of the catalog. You can still see the book on the shelf, but it’s hard to find without the catalog entry. The original book is still there, though, until a new book is put on that same shelf space.
This is why you need to act quickly when you realize you’ve deleted something important by mistake. The longer you wait and the more you use your computer, the more likely it is that new data will overwrite the space where the deleted file was stored. This makes recovery much harder, or even impossible.
Method 1: The Recycle Bin or Trash Can is Your First Line of Defense
The Recycle Bin on Windows and the Trash Can on Mac are the first places you should always look for files that have been deleted. These are places where files you’ve deleted can be kept for a short time, giving you a backup in case you delete something by mistake.
Getting Files Back from the Recycle Bin in Windows 10 and 11
Open the Recycle Bin: You can usually find its icon on your desktop. To open it, double-click it.
2. Find Your Deleted Files: Look through the items in the Recycle Bin. You can help yourself find what you’re looking for by sorting files by the date they were deleted, their size, or their original location.
Restore the File(s): After you find the file(s) you want to get back, you have a few choices:
Click on the file(s) with the right mouse button and choose “Restore.” This will put the file(s) back where they were before.
Drag and drop the file(s) from the Recycle Bin to any folder on your computer.
Click the “Restore the selected items” button at the top of the Recycle Bin window after choosing the file(s).
- Empty Recycle Bin: If you’ve already emptied the Recycle Bin, this method won’t work. In that case, you should look into the next steps.
Getting Files Back from the Trash Can on a Mac
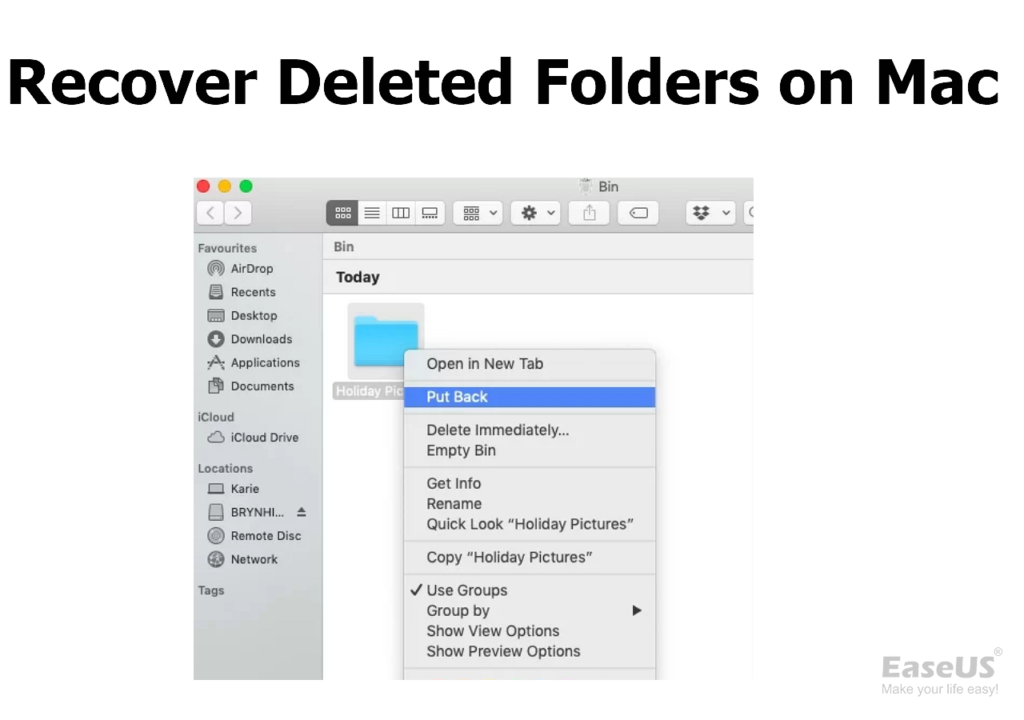
Open the Trash: Click on the Trash icon on your Dock.
Find Your Deleted Files: Look through the files in the Trash. You can search for specific file names by using the Finder’s search bar (Command + F).
Put Back the File(s): To put a file back,
Control-click (or right-click) on the file(s) and choose “Put Back.” This will put the file(s) back in the folder they came from.
Drag and drop the files from the Trash to your desktop or any other folder.
- If you’ve emptied the Trash, the files are gone, just like in the Recycle Bin. You’ll need to use other ways to get them back.
Useful Tip: Before you empty your Recycle Bin or Trash Can, check it often. You might be shocked by what you find in there!
Method 2: Using Built-in Tools for Backup and Recovery
Windows and macOS both have built-in tools for backing up and restoring files that can help you get back deleted files. These tools take pictures of your system and files at different times, so you can go back to an earlier version.
Windows 10 and 11 File History
File History makes backups of your files in the Documents, Music, Pictures, Videos, Desktop, and OneDrive offline folders without you having to do anything. You can easily get back deleted files if you have File History turned on.
**Type “Restore your files with File History” into the Windows search bar and hit enter.
Find Your Folders: Use the File History interface to find the folder where your deleted file(s) were.
Browse Through Backups: Use the arrow keys to look through different versions of the folder from different times.
Select and Restore: After you find the folder version that has your deleted files, click on the file(s) and then the green “Restore” button. The file(s) will go back to where they were before. You can also save the file(s) to a different place by right-clicking the Restore button and choosing “Restore to…“
Tip: To make sure your important files are backed up regularly, make sure File History is turned on and set up. File History needs an external hard drive or a network location to save backups. In the Windows search bar, type “File History settings” to find the settings.
Time Machine on a Mac
Time Machine is the built-in backup tool for macOS. If you have been using Time Machine, you can restore your whole system or just some files from a backup you made before.
Open Time Machine: To open Time Machine, click the clock icon in the menu bar and choose “Enter Time Machine.” You can also find it in System Preferences.
Navigate Through Backups: Time Machine will show you a Finder-like interface with pictures of your files and folders from different times and dates. To get to a backup before the file(s) were deleted, use the timeline on the right side of the screen.
Find Your Deleted Files: Look through the folders to find the file(s) you deleted.
Choose and Restore: Choose the files you want to get back and click the “Restore” button. The file(s) will be put back where they came from.
Tip: Buy an external hard drive and turn on Time Machine. It’s the easiest and most complete way to keep your Mac’s data safe. You can usually find the settings for Time Machine in System Preferences (Monterey and earlier) or System Settings (Ventura and later).
Method 3: Using Data Recovery Software
If you’ve emptied your Recycle Bin or Trash Can or haven’t been using the built-in backup tools, data recovery software is the next best thing. These specialized programs look for traces of deleted files on your hard drive or SSD and try to put them back together.
There are many free and paid data recovery programs to choose from. Some popular options are:
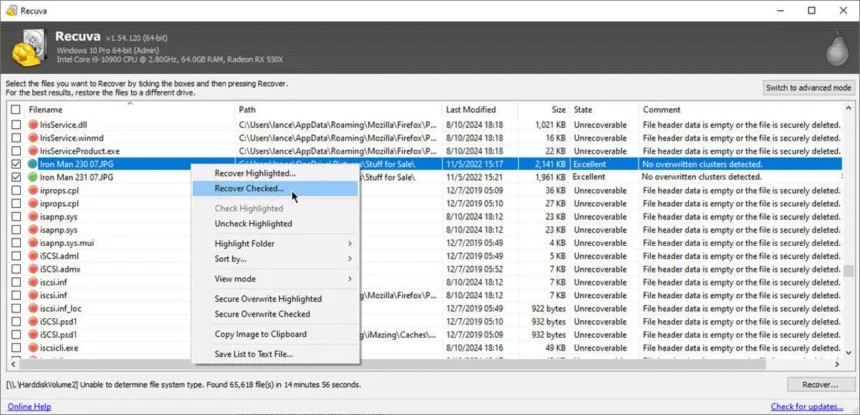
Recuva (Windows): A free and easy-to-use choice for Windows. (Link to download Recuva)
EaseUS Data Recovery Wizard (Windows & Mac): A powerful but easy-to-use program that comes in both free and paid versions. (Link to EaseUS Data Recovery)
Disk Drill (Mac & Windows): This program is known for being easy to use and having strong recovery features. (Link to Disk Drill)
TestDisk & PhotoRec (Windows, Mac, Linux): These are free, open-source tools that are very powerful, but they can be a little hard to use. (Link to TestDisk and PhotoRec)
How to Use Data Recovery Software in General
Here’s a general outline of the steps you need to take, though they may differ slightly depending on the software you choose:
Get the Software and Install It: Get the data recovery software from a trusted source and put it on your computer. Important: To avoid overwriting the deleted files, install the software on a different drive or partition than the one where the files were deleted. If you only have one drive, you might want to use a portable version of the software on a USB drive.
Choose the Drive to Scan: Open the software and choose the drive or partition where the files you want to recover were stored.
Start the Scan: Begin the process of scanning. The software will look through the drive to find files that can be recovered. Depending on how big the drive is and how much data is lost, this process can take a while.
Filter and Preview Recoverable Files: After the scan is done, the software will show you a list of files that can be recovered. You can usually narrow down your search by file type, date, and size. A lot of programs also let you see files (especially pictures and documents) before you recover them.
Choose Files to Recover: Pick the files you want to get back.
Choose a Recovery Location: Pick a different drive or partition to store the files you want to recover. Again, don’t save them back to where they came from. This could overwrite other data that could still be recovered.
Start the Recovery Process: Begin the process of recovery. The program will try to put the chosen files back where they were.
Tip for the Real World: If you think you might have lost data, try not to use the computer that has the problem as much as possible until you’ve tried to get it back. This makes it less likely that you will overwrite the files you deleted.
Method 4: Getting Help from a Professional Data Recovery Company
If the other methods don’t work or if your drive is physically damaged, your best bet might be to hire a professional to recover your data. These businesses have the right tools and know-how to get data back from storage devices that are very broken.
Professional data recovery can be expensive, though, so it’s usually only used as a last resort for important data that can’t be recovered any other way.
Helpful Hint: Look up reliable data recovery services in your area or online. Find businesses that have good reviews and clear prices.
Useful Tips for Keeping Your Data Safe
The best way to get back files that have been deleted is to stop them from being lost in the first place! Here are some important tips that you should use every day:
Backups on a regular basis: This is the most important thing to do. Back up your important files on a regular basis to an external hard drive, a network location, or a cloud storage service using Windows File History or macOS Time Machine. The 3-2-1 backup rule says that you should have at least three copies of your data, on two different types of storage, and one of those copies should be stored somewhere else.
Be Careful When Deleting: Before you delete any files or folders, especially if they are important, make sure you double-check.
Be Careful When Emptying Your Trash Can or Recycle Bin: Before you empty your Trash Can or Recycle Bin, take a quick look to make sure you aren’t getting rid of anything you might need later.
Use Cloud Storage: Services like OneDrive, Google Drive, and Dropbox automatically back up your files to the cloud and keep track of their versions. (Backlink to a blog post that compares different cloud storage services)
Install Good Antivirus and Anti-Malware Software: Malware infections can sometimes cause you to lose data. Always update your security software and run scans on a regular basis.
Be Careful with External Drives: To avoid data loss, make sure to safely eject external drives before unplugging them.
Think about getting a UPS (uninterruptible power supply). Power outages can sometimes corrupt data while it’s being written. A UPS can give your computer temporary power so it can shut down safely.
You Can Get Back Files You Deleted!
It can be stressful to lose important files, but as this guide has shown you, it’s usually not a permanent loss. You greatly improve your chances of recovering a deleted file if you know what happens when you delete it and use the different methods and tools available, such as the Recycle Bin/Trash Can, specialized data recovery software, and even professional services.
By following the practical tips for avoiding data loss, you can lower the chance of having to deal with this problem in the first place. The best ways to keep your important digital data safe are to back it up often and be careful with how you handle files.
Take a deep breath and remember this guide the next time you delete a file by mistake. You can do this!
https://bigezwehotv.rw/category/trends