The wheel with the rainbow on it. The sound of the startup chime that sounds like it’s playing in slow motion. The awful message that says “Your startup disk is almost full” that pops up at the worst possible time. We have all been there. The sleek, lightning-fast machine you were so excited to unbox has slowly turned into a digital swamp that is slow and hard to use.
But what if I told you that you don’t have to put up with a slow Mac? What if you could get that “new Mac” feeling back without buying a new one? Yes, you can.
This is the best guide to getting your machine’s power back. Over the next 2500 words, we’ll go into great detail about a three-step process that has been shown to clean up, revive, and optimize your Mac system. This isn’t about giving you vague advice; it’s about giving you clear, step-by-step instructions that will change how you use the site. Don’t be angry. It’s time to get your Mac going again.
The Usual Suspects: Why Your Mac System Slows Down Over Time
Before we get to work, it’s important to know why your Mac isn’t working right. Performance problems don’t happen all at once; they happen over time. It’s the slow buildup of old instructions and digital junk. Here are the main people who are to blame.
The Digital Hoarder’s Dilemma: Too Much Stuff on Their Hard Drive
Your Mac’s storage (SSD or hard drive) is like a workshop. When it was new, all the tools were where they belonged, and there was a lot of room to work. But over time, you’ve gathered project scraps, old drafts, tools you don’t use, and dust. This is what happens to your Mac. Every time you download a file, install an app, or edit a photo, you make data. This includes:
Cache Files: These are files that your apps and system make to speed up loading the next time. But when this cache gets too big or gets messed up, it does the opposite.
Log Files: Your Mac keeps track of what the system and apps are doing. These logs can be helpful for fixing problems, but they can also add up to gigabytes of useless text.
Old Downloads: Your Downloads folder is often full of installers, PDFs you only looked at once, and ZIP files you never opened.
Language Files: A lot of apps come with localization files for a lot of languages you won’t use, which takes up space for no reason.
A drive that is almost full doesn’t just mean you can’t save new files. Your macOS needs free space (at least 10–15% of your total storage) to work well. It uses this space as virtual memory when your RAM is full. When that space runs out, everything stops.
RAM Overload: Too Many Cooks in the Kitchen
RAM, or Random Access Memory, is the short-term memory of your Mac. This is where all of your currently running apps and processes are. The more RAM you have, the more things you can do at once without your computer slowing down. But modern computers are hard to work with.
A dozen browser tabs, a messaging app, a music player, a photo editor, and a few background utilities can quickly use up all of your RAM. This makes your Mac use your (much slower) hard drive as “swap” memory, which causes the dreaded spinning beachball of doom.
Outdated Software and macOS: A Crumbling Foundation
Would you put up a skyscraper on a base from 1995? Using old software is like running a computer. Apple and app developers are always putting out updates that add more than just new features. They include important security updates, bug fixes, and, most importantly for us, performance improvements.
Older versions of operating systems may not work well with newer programs and may be less efficient than newer versions. As we talk about in our guide to the best features of macOS Sonoma, it’s important to keep up to date.
Background Processes: The Quiet Killers of Performance
You may think you only have a few apps open, but your Mac is actually very busy behind the scenes. System daemons, menu bar agents, and background syncing services (like iCloud, Dropbox, or Google Drive) are always running, using up CPU cycles and memory.
Most of the time, third-party apps are useful, but some of them install agents that run forever, even after you quit the main app. These agents use up your Mac’s resources without you knowing it.
Phase 1: The Great Mac Clean Up – Get Your Digital Space Back
It’s time to fight back now that we know who the enemy is. The first step is to do a full-scale “clean up” of your “Mac system.” The goal is clear: get back as much storage as you can. A drive that is cleaner is also faster.
The Easiest First Step: Apple’s Built-in Storage Manager
Let Apple do some of the hard work before you start looking through strange folders. The most recent versions of macOS come with a great built-in tool for managing storage.
In the top left corner of your screen, click the Apple menu.
Click on “System Settings…” (or “About This Mac” on older versions of macOS).
Click on General and then Storage.
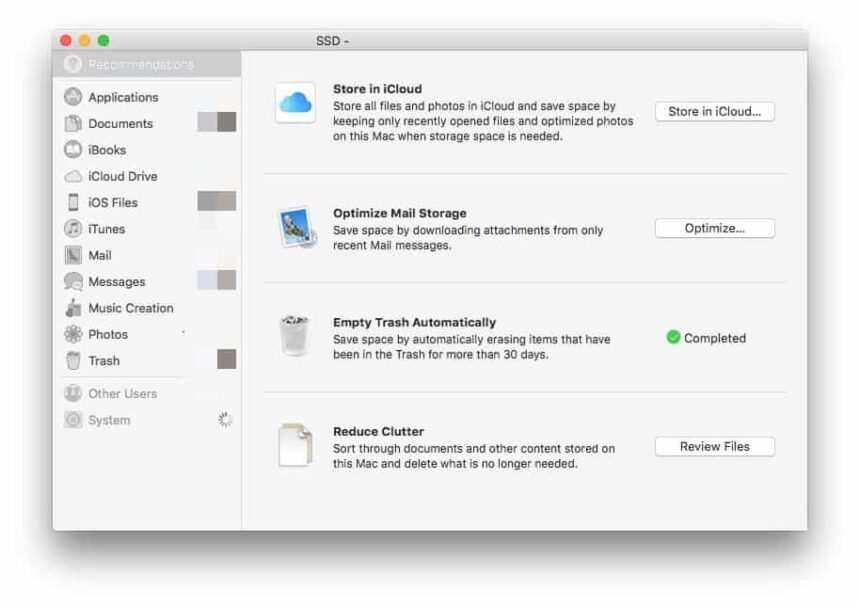
You’ll see a bar with different colors that shows what’s taking up your space. Wait for it to finish calculating, and then look over the suggestions below it.
Store in iCloud: This sends your Desktop and Documents folders, as well as your Photos and Messages, to iCloud, where they are only downloaded when you need them. If you have a good internet connection and enough iCloud storage, this will save you a lot of space.
Optimize Storage: This feature automatically deletes movies and TV shows you’ve already watched from your Mac and keeps only the most recent email attachments.
Automatically Empty Trash: This is a no-brainer. This feature automatically gets rid of things that have been in the Trash for more than 30 days.
Get Rid of Clutter: This is the best manual tool. It makes it easy to delete a lot of files, downloads, and apps that don’t work by letting you quickly look over them.
Stay here for 15 minutes. With little effort, you can often free up tens of gigabytes. Apple’s official support page is a great place to find out more.
Looking for the Space Hogs by Hand
The storage manager is great, but a manual search can find even more.
Go After the Downloads Folder: This is your main goal. Open Finder, go to your Downloads folder, and sort by “Date Added.” Don’t hold back. Get rid of old app installers (.dmg files), ZIP files you’ve already opened, and anything you haven’t used in months.
Find Big and Old Files: Finder is a great way to search for things.
Start a new Finder window.
2. Press Command + F.
3. Click on the “Kind” dropdown in the search bar and choose “File Size.”
4. Choose “is greater than” from the next dropdown and type in a size, such as “1 GB.”
This will show you all the files on your Mac that are bigger than 1 GB. Look over what you have and get rid of what you don’t need. You can add a new rule for “Last Opened Date” to find big files you haven’t opened in years.
Tip for the Real World: A messy desktop isn’t just ugly; it slows down your computer. Your Mac treats every icon on the desktop as an open window, which uses up resources. Clean up your desktop! You can either move files into documents or use the Stacks feature (right-click on the Desktop and choose Use Stacks) to group them automatically.
The Cache Problem: What to Get Rid of and What to Keep
Caches are temporary files that are supposed to make things go faster, but they can get too big and broken. You can free up gigabytes of space and fix strange app bugs by clearing them.
Warning: If you delete the wrong files from your Library folder, your system may become unstable. Before you go any further, make sure you have a current backup. Before you touch these folders, we strongly suggest that you read our comprehensive guide to the best Mac backup strategies.
Open Finder.
In the menu bar, click Go and then Go to Folder….
3. Press Enter after typing ~/Library/Caches. This is the cache for your user.
Select all the folders inside (Command + A) and drag them to the Trash. Don’t worry; your Mac will make what it needs again.
Do the same thing for /Library/Caches, which is the system-wide cache.
You’ll also want to clear your browser cache directly from the settings in Safari, Chrome, or Firefox, as this is often a big problem.
Duplicate Files: The Space Thieves That Hide
Over the years, you’ve probably saved a lot of files more than once, like photos you imported twice, song files in different playlists, and documents you saved with different names. It’s almost impossible to find these by hand. A dedicated third-party app can be very helpful in this area.
There are tools like Gemini 2 or the duplicate finder module in CleanMyMac X that are made to scan your system and safely get rid of exact copies. This can free up a lot of space.
Phase 2: Get Your Mac Running Faster Again—Feel the Speed Again
Now that your drive is clean and lean, it’s time to make the system more responsive. The goal of this phase is to make your Mac’s CPU and RAM work less hard.
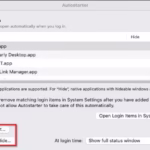
Get Your Login Items and Background Agents Under Control
The army of apps and utilities that start up automatically every time you turn on your Mac is one of the biggest things that slows it down.
Open System Settings, then General, and then Login Items.
There are two parts to this:
Open at Login: These are apps that start up completely when you log in. If you don’t need an app to open right away, click on it and then the “–” button.
Allow in the Background: This is a newer and more important part. It shows all the little helper tools and agents that work in the background. Take a close look at this list.
If you see something from an app you don’t use anymore, turn it off. Be careful when you turn off things you don’t know what they are, but if you see an updater for an app you deleted, it’s okay to turn it off.
A smaller set of startup items means that your computer will start up much faster and have more resources right away.
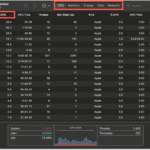
Use Activity Monitor to Spot Resource Hogs
Activity Monitor is a built-in tool that helps you find problems on your Mac. It’s like an EKG for your computer; it shows you exactly what’s going on inside.
To open it, go to Applications > Utilities > Activity Monitor.
2. Pay attention to the CPU and Memory tabs.
To sort processes from most to least demanding, click the top of the % CPU or Memory column.
If you notice that a process is using a lot of your CPU (more than 70–80%) when it shouldn’t be, or an app is using too much RAM, you’ve found the problem. It could be an app that isn’t optimized well or a process that has gotten out of control. You can choose the process and then click the “X” button at the top to quit it. Apple’s guide on Activity Monitor is a great place to go for a more in-depth look at how to use it.
Useful Tip: Web browsers are known for using a lot of resources. If you see a process called “Google Chrome Helper (Renderer)” or “Safari Web Content” using a lot of CPU, it’s probably a website or extension that’s the problem. To find the problem, try closing tabs one at a time.
Take care of your browser add-ons
Every browser extension you add uses memory and CPU cycles, even when you’re not using it. It’s a good idea to do an audit every three months.
In Safari, click on Settings and then Extensions.
In Chrome, click on Settings and then Extensions.
Turn off or, even better, uninstall any extensions you don’t use often. Your browser will feel lighter and faster right away.
Lower the Visual Effects for a Snappier Feel
There are lots of smooth animations and see-through effects in macOS. But these graphics come at a cost to your CPU and graphics processor. Turning down the settings on older or less powerful Macs can make them run a lot better.
- Click on System Settings > Accessibility > Display.
- Put a check in the boxes next to “Reduce motion” and “Reduce transparency.”
This will get rid of the “swoosh” sound when you open apps and Mission Control and make the sidebars that are see-through opaque. The system won’t look as flashy, but it will be much faster and more responsive.
Step 3: Make Your Mac Work Better for the Long Term
It’s great to clean and revive your Mac, but how do you keep it that way? This last step is all about setting up routines and habits to get the most out of your Mac system so it can keep working at its best.
The Golden Rule: Always update macOS and your apps.
This is the most important thing you can do to keep your car in good shape. Make your Mac update on its own.
Click on System Settings > General > Software Update.
Click the “i” button for information next to “Automatic updates.”
Make sure that “Check for updates,” “Download new updates when available,” and “Install macOS updates” are all on. Also, make sure to turn on “Install application updates from the App Store.”
If you downloaded an app from the internet, look for updates in the app itself (usually in the menu bar or settings). A system that has been updated is safe, stable, and works better.
Regular Backups: The Safety Net You Can’t Live Without
Peace of mind is an important part of digital optimization. You can delete old files and try out new settings without worrying about losing data if you know you have a full, up-to-date backup. Time Machine from Apple is free, comes with the computer, and is very easy to use. You only need an external hard drive.
Tip: Get an external SSD that is at least twice as big as the internal storage on your Mac. When you plug it in, macOS will ask if you want to use it for Time Machine.
Say yes, and it will take care of everything else, making automatic backups every hour in the background. This is the best “set it and forget it” insurance policy for your digital life.
Make your files and workflow more efficient by organizing them
A file system that is messy is not very useful. Don’t just throw everything on your Desktop or in your Downloads folder. Make a system that works for you.
Keep your folders simple: A common way to do this is to have a “Work” folder and a “Personal” folder. Make subfolders inside each one by year and then by project or event. For example, “Documents/Work/2025/Q3_Report.”
Use Cloud Storage Wisely: For active projects and working together, use services like iCloud Drive, Dropbox, or Google Drive. Don’t use them as a place to throw things away. Archive finished projects to an external drive on a regular basis.
Name Files Sensibly: “Final_Report_v3_Final_USE_THIS_ONE.docx” is a sure way to get into trouble. Use a clear way to name things, like “ProjectName_Report_YYYY-MM-DD.docx.”
How to Know When to Upgrade Your Hardware
Changes to software can make a big difference, but they can’t change the laws of physics. You might be reaching the limits of your Mac’s hardware if it’s more than 5 to 7 years old. If your MacBook Pro or iMac is from before 2015 and can be upgraded by the user, two upgrades give you the most value for your money:
Switching to an SSD: If you still have a spinning hard drive (HDD), switching to a Solid State Drive (SSD) will give you the biggest boost in performance. It’s a huge difference.
Adding More RAM: If you always see your “Memory Pressure” in Activity Monitor in the yellow or red, you can run more programs smoothly by adding more RAM (if your model allows).
I often tell people to go to OWC (macsales.com) for reliable parts and guides. They have been a trusted source for Mac hardware upgrades for a long time. These upgrades aren’t possible on newer Macs with soldered parts, so the software improvements we’ve talked about are even more important.
Your Mac, New Again
We’ve done a lot, from getting rid of gigabytes of useless digital stuff to making small changes to the tiny processes that control how fast your Mac runs. This list may seem overwhelming, but you don’t have to do everything at once.
This simple but powerful plan will help you get a faster Mac: Clean Up your storage, Revive your active processes, and Optimize your long-term habits.
Start now. Choose one thing from this guide: clear out your Downloads folder, check your Login Items, or turn on automatic updates. Each little thing you do will add up, and soon your Mac will feel less like a chore and more like the powerful tool it was meant to be. Get back your sanity, your creativity, and your ability to get things done. Your Mac will be happy you did it.
https://bigezwehotv.rw/trends/