Do you remember the first time you took your computer out of the box? It felt like magic how quickly it booted up and how quickly it responded. A few months or years later, that magical Startup now feels more like a slow, annoying crawl. You hit the power button, go make coffee, and when you get back, it’s still loading. What took place? A silent invader, too many Startup Programs, is the most common cause.
Many programs add themselves to your computer’s startup sequence without you knowing it every time you install new software. As soon as you log in, they start running in the background, using up memory (RAM) and processing power before you even open a file. But here’s the good news: you have the power.
This complete guide will show you exactly how to get rid of startup programs on your Windows or Mac computer. We’ll make the process easier to understand, turning what seems like a complicated job into a simple, helpful habit. Get ready to cut down on how long it takes to boot up your computer and make it feel like new again.
What Are Startup Programs and Why Should You Care?
Startup Programs are apps, services, and tasks that are set up to start up automatically when your computer does. This is supposed to be a helpful feature. For instance, making sure that your antivirus software, cloud storage (like Dropbox or OneDrive), or the control panel for your graphics card loads when your computer starts up makes sure that they are running and protecting or syncing your files right away.
The issue is caused by “software bloat.” Many programs, like music players, PDF readers, gaming clients, and system utilities, automatically start up when you turn on your computer, even if you don’t need them to. Every program you add to this list makes your system work harder during the important boot-up phase.
You know how hard it is to wake up and have to do ten things at once? Your computer feels the same way. When you learn how to remove startup programs you don’t need, you’re basically giving your computer a clearer, more focused morning routine. The benefits are clear right away:
Boot Times That Are Much Faster: This is the most obvious change. In a matter of seconds, not minutes, your desktop will be ready to use.
Better Overall Performance: Since fewer programs are running in the background, your computer has more RAM and CPU power for the programs you really want to use.
Longer Battery Life for Laptops: Your laptop will use less power because there are fewer active processes. * A Cleaner, More Responsive System: Your PC will feel less cluttered and work better every day.
The experts at How-To Geek give a great explanation of how background processes affect performance.
Your Step-by-Step Guide: How to Get Rid of Startup Programs on Any Computer
Are you ready to act? The way you manage your startup depends on what kind of operating system you have. We have made it easy to understand for all versions of Windows and macOS.
How to Get Rid of Startup Programs in Windows 11 and 10
The Task Manager in Microsoft’s newest operating systems makes it very easy to manage startup programs.
Open the Task Manager: Use the keyboard shortcut “Ctrl + Shift + Esc” to get there the fastest. You can also right-click the Start button and choose “Task Manager” from the menu that appears.
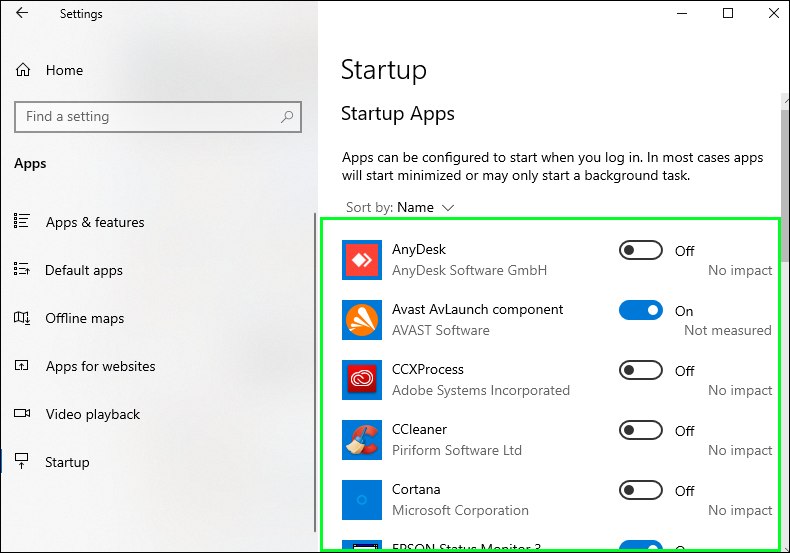
Go to the Startup Tab: In Windows 11, the “Startup” tab is an icon that looks like a speedometer on the left side of the Task Manager window. In Windows 10, it’s along the top. [Image: A screenshot of the Windows 11 Task Manager with the “Startup apps” tab highlighted. Alt Text: To start removing startup programs in Windows 11, go to the Startup apps section.
Look at and turn off: You will see a list of all the programs that are set to start up when your computer does. The Task Manager gives you useful information:
Name: The name of the program. * Publisher: The person or company that made the software. This helps you find real programs.
Status: Tells you if it’s “Enabled” or “Disabled.”
Effect on Startup: This column is very important! Windows rates the effect as “High,” “Medium,” “Low,” or “Not measured.” Put disabling programs with a “High” impact at the top of your list.
Turn off the programs that aren’t needed: To turn off a program, just right-click on it and choose “Disable.” That’s it! The program won’t start up on its own anymore. You can still open it by hand whenever you need to; it is NOT uninstalled.
You can always go to the Microsoft Support page on changing startup apps in Windows for more official help.
How to Turn Off Startup Programs in Windows 8 and 8.1
The steps for Windows 8 are the same as those for Windows 10. This version came out with the new Task Manager. Just do what you did before: press “Ctrl + Shift + Esc,” go to the “Startup” tab, right-click, and turn it off.
How to Control Startup Programs in Windows 7
The tool is different for the millions of people who still use Windows 7, but the idea is the same. You will use the System Configuration tool, which is also known as “msconfig.”
Launch the System Configuration Tool: To open the search bar, click the Start button and type “msconfig.” Hit Enter.
Click on the Startup Tab: In the System Configuration window, click on the “Startup” tab.
Uncheck to Turn Off: A list of startup items will appear. It doesn’t give as much information about the impact as the modern Task Manager, but you can see the program and the maker. To turn off a program, just uncheck the box next to its name.
Click “Apply,” then “OK.” To make the changes take effect, you will need to restart your computer. You can choose to restart later if you want to.
How to Get Rid of Startup Programs on macOS
Apple’s macOS calls these things “Login Items.” It’s just as easy to manage them on Windows.
Open the Settings for the System: On macOS Ventura and later, click the Apple logo in the top-left corner of your screen and choose “System Settings.” On older versions, choose “System Preferences.”
**Find Login Items:
For macOS Ventura and later: In System Settings, click on “General” and then “Login Items.”
For macOS Monterey and older: Click “Users & Groups” in System Preferences, choose your user account, and then click the “Login Items” tab.
Control the programs that start up with your computer: You will see two lists:
- Open when you log in: These are the apps that start up on their own. To get rid of one, click on the application in the list and then click the minus (
-) button below it.Let in the Background:** This part lists apps and services that can do things in the background without being fully open. If you see an app that doesn’t need this permission, you can turn it off
Close the Window: Your changes are saved right away. When you restart your Mac again, the apps you deleted will not start up.
Apple’s official support guide is a great place to go for more information.
“Should I or Shouldn’t I?” Guide to Popular Startup Programs
Now that you know how to turn them off, the big question is what to turn off. If you turn off the wrong thing, like your antivirus or important system drivers, it could cause problems. This is a quick reference list.
**Usually Safe to Turn Off:
Software Updaters: (for example, Adobe Updater and Google Update). These are useful, but you don’t have to run them at startup. You can always check for updates in the apps themselves.
Gaming Clients: (like Steam, the Epic Games Launcher, and the EA App). Turn these off if you don’t want to start a game as soon as your PC starts up. They use a lot of resources.
Media Players: (for example, Spotify and iTunes Helper). Do you want Spotify to open on its own every time? Most likely not. Start it up when you want to hear music.
Quick Starters / Helpers: A lot of programs, like Microsoft Office or Adobe, come with “helper” apps that load parts of the software ahead of time. If you turn them off, the app might take a second or two longer to open, but it will free up your startup.
Most Third-Party Utilities: If you don’t use it every day, turn off the startup sequence for print software, phone syncing apps, camera managers, and other third-party tools.
Should Usually Stay On:
Antivirus/Anti-Malware Software: (for example, Windows Security, Bitdefender, Norton, and Malwarebytes). This is the first thing you should do to protect yourself. It needs to start up as soon as your computer does.
Audio Drivers: (for example, Realtek HD Audio Manager). These let you control the sound on your computer. If you turn them off, you might not be able to hear anything until you start them up again.
Graphics Drivers: (for example, the NVIDIA Control Panel or the AMD Catalyst Control Center). They aren’t strictly necessary for your display to work, but they do control advanced settings and performance. It’s best to leave them alone.
Cloud Sync Services: (like Google Drive, OneDrive, and Dropbox). You should keep these on if you need them to keep your files in sync in real time. You could turn off syncing files if you only do it once in a while and do it by hand when you need to.
Processes that are important to the system: If the publisher field has the name of a computer maker, like Dell or HP, or the name of a company that makes software for Microsoft or Apple, you should leave it alone unless you know what it does. If you’re not sure what a program does, a quick Google search of its name can help.
Useful Tips for Your Daily Life: Getting Used to Being Fast
It’s not enough to learn how to remove startup programs once; you need to do it again and again. Here are some useful tips to use in your digital life.
“The Check After Installation”: Get used to it. Every time you install a new program, open your startup manager (Task Manager or Login Items) right away and see if it added itself. If you don’t need it, turn it off right away.
Do a Review Every Three Months: Every three months, set a reminder on your calendar to check your startup list. You might find that programs you don’t use anymore have come back or were still on.
Be Careful When Installing: A lot of application installers let you choose “Custom Installation.” During the setup, pay attention! A checkbox that says “Start with Windows” or “Launch at Login” is often there, and it’s usually already checked. Don’t check it.
Restart and See the Difference: Always restart your computer after you’ve cleaned up your startup list. This not only makes the changes, but it also gives you the satisfying feeling of a faster, cleaner startup.
Advanced Tools and Best Practices: What You Need to Know
The built-in tools are great for most people, but power users may want more control and information.
Autoruns for Windows: If you want the most control over Windows, Autoruns from Microsoft’s Sysinternals suite is the best. It shows you everything that starts up with your PC, not just apps. It also shows drivers, services, scheduled tasks, and more. It’s a very powerful tool, but be careful: with great power comes the ability to really screw things up. Only use it if you are sure.
CleanMyMac X: If you’re a Mac user looking for an all-in-one solution, CleanMyMac X has a powerful Optimization module that makes it easier to manage Login Items and Launch Agents by giving you more context and better controls than the built-in macOS tool.
Think about getting an SSD: If your computer still has a traditional hard disk drive (HDD), the best way to speed up startup is to switch to a solid-state drive (SSD). An SSD can make an old computer feel brand new by cutting boot times from minutes to seconds. You can make your computer really fast by putting an SSD in it and cleaning up the startup list. There are great guides on the best SSDs on well-known tech review sites like PCMag.
Get Your Startup Back Under Control
A computer that takes a long time to start up is not something that will always happen; it’s a problem that can be fixed. The main reason is the mess of unnecessary startup programs, and you now know everything you need to know to fight back.
One of the best ways to keep your computer in good shape is to regularly curate your startup list by turning off the ones you don’t need and keeping the ones you do. You’re not just making your computer boot up faster; you’re also making it more stable, responsive, and fun to use every day.
So go ahead. Right now, open your System Settings or Task Manager. Find out what’s been making you slow down. Follow the steps we’ve given you on how to remove startup programs to get back the speed and efficiency you deserve. Your computer and your patience will thank you for it.
https://bigezwehotv.rw/category/trends