Does your trusty laptop feel more like a horse-drawn carriage than a fast jet? Do you ever find yourself staring at loading screens, grinding your teeth as apps freeze, and wishing you could go back to the day you first opened your computer? Before you give in and spend a lot of money on a new device, I have a secret that will change everything for you: Installing memory in your laptop is one of the Pong’s…
This is the ultimate guide to giving your computer a new lease on life. My name is Alex, and I’ve been helping people understand technology and give themselves the tools they need to make their own upgrades for more than ten years. You might think that only the tech-savvy people at Geek Squad can upgrade your RAM (Random Access Memory), but I’m here to show you that it’s actually pretty easy. With a little planning and 15 to 30 minutes of your time, you can greatly improve your laptop’s ability to do more than one thing at once and its overall speed.
It’s not just about speeding up your laptop; it’s also about making your life easier. It’s about spending less time waiting and more time doing, whether you’re a student juggling research papers and online classes, a professional managing multiple projects and video calls, or a creative working with difficult software. This guide will show you how to do everything, from finding the right memory for your laptop to the last satisfying click when the new module locks into place. Let’s get going.
Why Should You Upgrade? The Real Benefits of More RAM
Let’s talk about the “why” before we get our hands dirty (figuratively, of course—we want to keep things clean!). What is RAM, and how does adding more of it make the user experience better?
You can think of RAM as your laptop’s digital workspace or short-term memory. The RAM keeps track of every application, browser tab, and file you open so that the processor can get to them quickly. If your laptop doesn’t have enough RAM, it has to use some of its hard drive or SSD as “virtual memory.” This process, called swapping, is very slow compared to getting data straight from RAM.
Here’s how upgrading your RAM will affect your daily life:
Easy Multitasking: Do you remember the last time you had 20 Chrome tabs open, along with Spotify, Slack, and a Word document, and your laptop stopped working? More RAM gives you more space to work, so you can run more programs at once without them slowing down.
Faster Application Performance: Programs that use a lot of memory, like Adobe Photoshop, video editing software, or even complex Excel spreadsheets, will load faster and run more smoothly.
A Faster OS: Your whole operating system, whether it’s Windows 11, macOS, or a Linux distribution, will feel more responsive. Menus will open right away, and switching between apps will be easy.
Better Gaming: A RAM upgrade won’t turn your business laptop into a high-end gaming rig (that’s the GPU’s job), but it can make many games run smoother and at higher frame rates, especially if you were already using all of your memory.
This great article from Kingston Technology will help you understand how RAM works even better. Upgrading is one of the most important things you can do, right after upgrading from an HDD to an SSD.
Step 1: Getting Ready—Finding the Right Memory for Your Laptop
This is the most important step. If you put the wrong kind of RAM in your computer, it’s like trying to fit a square peg in a round hole. It won’t work and could even hurt your motherboard. We need to find answers to two important questions: Can you upgrade your laptop? If so, what kind of memory does it need?
Is it even possible to upgrade the memory on your laptop?
The sad truth is that not all new laptops let you add more RAM. To save space, many ultra-thin models, such as some MacBook Airs, Dell XPS 13s, and Microsoft Surface Laptops, have their RAM modules soldered directly to the motherboard.
How to Check:
The Easy Google Search: The easiest way to find out how to upgrade your laptop’s RAM is to type in your laptop’s model number and then “RAM upgrade.” For instance, “RAM upgrade for Dell Inspiron 15 5593.” You might be able to find articles, forum posts, or YouTube videos that say it’s possible.
Important System Scanner: The Crucial® System Scanner is my favorite tool for this. It’s a safe and dependable program that checks your system and tells you not only if an upgrade is possible, but also what kinds of memory will work with it and how much memory it can hold at most.
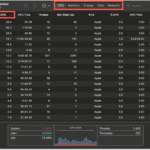
Check Task Manager (Windows): To open Task Manager, press “Ctrl + Shift + Esc.”
Click on “Memory” in the “Performance” contributions.
Check the right side. It will show you how fast your RAM is right now (for example, 3200MHz) and how many slots are being used (for example, “Slots used: 1 of 2”). You’re in business if you have an open slot!
How to Figure Out the Jargon: What to Look For
You need to buy the right module after you make sure you can upgrade. Here are the most important specs you should know:
Form Factor (SO-DIMM): Laptops have smaller memory modules than desktops. You need a SO-DIMM (Small Outline Dual In-line Memory Module). DIMM is the name for desktop RAM, and it won’t fit.
Type of Memory (DDR Generation): This is very important. Your laptop will use a certain generation, like DDR3, DDR4, or the newest one, DDR5. You can’t mix and match these. You have to buy DDR4 if your laptop uses it.
Speed (MHz): The clock speed of the memory, measured in Megahertz (e.g., 2666MHz, 3200MHz). It’s best to match the speed of your current RAM or the highest speed that your motherboard can handle. If you install RAM that is faster than what your system can handle, it won’t hurt anything. It will just run at the supported speed.
Capacity (GB): How much RAM do you need?
8GB: The least amount you need for smooth general use in 2025. Good for browsing the web, working in an office, and watching videos.
16GB: Most people will be happy with this amount. Great for doing a lot of things at once, playing popular games, and doing some light creative work.
32GB+: This is a good choice for professionals, hardcore gamers, video editors, and anyone who runs virtual machines or other tasks that use a lot of memory.
Useful Tip: If your laptop has two slots and one is taken up by a 4GB stick, you can upgrade to 16GB in one of two ways: by adding a second 4GB stick for a total of 8GB (not recommended), by replacing the 4GB stick with an 8GB stick for a total of 12GB (a good budget option), or by replacing the single 4GB stick with a new 2x8GB kit for a total of 16GB. The best way to make sure that dual-channel mode works at its best is to buy a matched “kit” (two identical sticks).
Step 2: The Main Event—How to Put Memory in Your Laptop
Okay, your new RAM is here. You’ve made a clean, well-lit place to work. It’s time. Don’t worry; this is the easy part.
Getting Your Tools Together
You don’t need a lot of tools. For 99% of laptops, you’ll only need:
A small Phillips-head screwdriver. A set of precise screwdrivers is a great, cheap buy for anyone who loves technology.
A plastic pry tool or an old credit card. This is to safely pop open the plastic clips that hold the bottom panel on. Don’t use a metal screwdriver to pry because it could scratch or damage the chassis.
An anti-static wrist strap (recommended but not required):** Static electricity is a quiet killer of computer parts. The right way to ground yourself is to wear an anti-static wrist strap that is connected to a metal object.
Helpful Tip for Everyday Life (and this task): You can ground yourself by touching an unpainted metal object, like a metal desk leg or the metal casing of a plugged-in (but turned off) desktop computer, every so often if you don’t have a wrist strap. Before you touch any parts, just do this.
How to Install Step by Step
1. Turn Off and Unplug: This is not up for discussion. Don’t just put your laptop to sleep; turn it off completely. Take out the power adapter and any other devices that are plugged in, like USB drives, external monitors, and so on.
**2. Take off the Back Panel:
To keep it from getting scratched, put your laptop upside down on a soft, non-static surface like a wooden table or a microfiber cloth. With your Phillips-head screwdriver, carefully take out all the screws that hold the bottom panel in place.
Pro Tip: Don’t lose track of your screws! Some laptops have screws that are different lengths. Using a magnetic tray or just taping them to a piece of paper in the order you took them out is a great trick. After taking out the screws, use your plastic pry tool or credit card to carefully go around the seam where the bottom panel meets the main body. As the clips let go, you’ll hear little “pops.” Be kind and patient.
3. Disconnect the Battery (Important Step!):
The first thing you should do when you get inside is find the battery and unplug its cable from the motherboard. This stops any short circuits from happening while you work. There is usually a small tab on the connector that you can pull or clips on the side that you can squeeze.
4. Find the RAM slots:
The RAM modules are usually hidden behind a small metal shield or are out in the open. You can easily see them because they are small green circuit boards held in place by clips on either side.
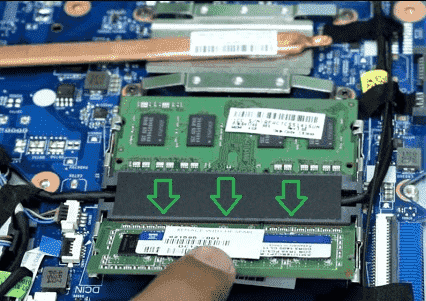
5. Take Out the Old RAM (If You Need To):
To take out an old SO-DIMM, use your thumbs to push the metal clips on each side out at the same time.
The module will come up at an angle of 45 degrees. After that, you can carefully pull the module out of the slot. To avoid touching the gold contacts, hold it by the edges.
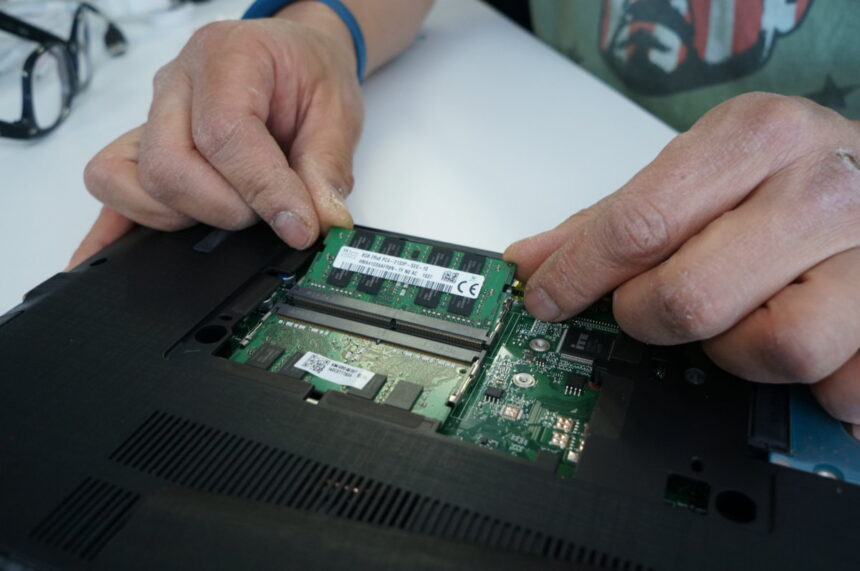
6. Put in the new memory:
Take your new RAM module and hold it by the edges again. Put the notch on the gold contacts of the module in line with the notch in the memory slot. There is only one way for it to go.
Put the module in the slot at a 45-degree angle, and make sure it’s all the way in. Press the module down gently toward the motherboard until the side clips click into place and hold it in place. You’ll hear and feel a nice click.
7. Put Everything Back Together:
That’s all! Now, do the opposite.
Reconnect the cable for the battery. Put the bottom panel back on carefully, making sure that all the clips snap into place. Change out all the screws. Just snug them up; don’t tighten them too much.
Step 3: The Moment of Truth—Checking and Fixing Problems
You did a good job of operating on your laptop. Now, let’s check on the patient to make sure they’re doing well.
Turn on the power: Connect the power adapter and turn on your laptop. If it takes a little longer than usual to start up the first time, don’t worry. The new hardware needs to be recognized and set up by the system’s BIOS/UEFI. This is called memory training, and it’s completely normal.
2. Check the New RAM:
On Windows: When your computer starts up, right-click the Start button and choose “System.” You can also open Task Manager (Ctrl + Shift + Esc) and go to the “Performance” > “Memory” tab again. You should see the new total amount of RAM that was reported.
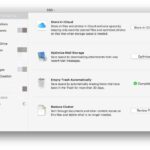
For macOS: To see the new amount of memory, click the Apple logo in the top left corner and then click “About This Mac.” The Overview tab will show the new amount.
3. Run a Memory Diagnostic (not required but recommended):
You can run a memory test to make sure your new RAM is completely stable.
Windows Memory Diagnostic: To run it, type “Windows Memory Diagnostic” into the Start Menu. It will need to be restarted.
MemTest86: You can use the industry-standard MemTest86 for a more thorough test. You will need to make a bootable USB drive, but this is the best way to be sure that your RAM is error-free.
Steps to Fix Common Problems
Laptop won’t start / Black screen: This is the problem that happens the most. Most of the time, this means the RAM isn’t in the right place. Don’t freak out. Unplug everything, open it up again, and put the memory modules back in. You need to hear that “click” sound. Also, make sure you reconnected the battery the right way.
RAM not found / Wrong amount showing: You might have bought the wrong DDR generation of RAM, or the module might be broken. If you’re sure it will work, try putting it in the other slot (if there is one). You might have to send it back for a new one if it still doesn’t work.
The system is crashing or unstable (Blue Screen of Death): This could mean that the RAM is broken. Do a full test with MemTest86. The module is broken if it reports errors.
Conclusion: Have fun with your new laptop
Well done! You now know how to put memory in your laptop. Not only did you make your computer run faster, but you also saved money and learned a useful new skill. You can use the sense of power you get from successfully upgrading your own tech in many other parts of your life.
You won’t feel helpless the next time your laptop is slow. You’ll know that you can figure out what’s wrong and, in a lot of cases, fix it yourself. This easy upgrade can add years to the useful life of your device, making it one of the best things you can do for your technology.
So go ahead and open as many browser tabs as you want. Start up that hard-to-use app. Enjoy the trouble-free, smooth, and responsive experience you’ve just unlocked.
https://bigezwehotv.rw/category/trends
Source Links & Further Reading:
- Crucial System Scanner: https://www.crucial.com/store/systemscanner
- Kingston Technology – What is RAM?: https://www.kingston.com/en/blog/pc-performance/what-is-ram
- MemTest86 – Memory Testing Tool: https://www.memtest86.com/