
We all know how it feels. You’re in the zone, whether you’re editing a video, making a graphic, or just keeping track of a dozen browser tabs for a research project. All of a sudden, it shows up. The spinning, multicolored pinwheel of death that everyone hates.
Your mouse is stuck, your work is ruined, and you’re starting to get angry. When your Mac is slow, it’s not just annoying; it hurts your ability to be creative and productive. But what if I told you that you could get rid of that beachball for good?
It’s not some expensive software that works like magic or a trip to the Genius Bar every other month. It’s information. The most important thing you can learn to keep your Mac running as well as it did when you first took it out of the box is how to check Mac system performance. It gives you the ability to find problems before they get serious, figure out what’s going on behind the scenes, and take the right steps.
This ultimate guide is your new Mac maintenance bible. We’re going to go deeper than just telling you to “restart your computer.” We’ll look at the Activity Monitor, which is like a mission control panel, figure out what “System Data” is and why it’s a storage black hole, play around with some powerful Terminal commands, and set up some easy, useful habits that will change how you use your computer. You need to stop letting your Mac control you and start controlling it. Let’s get going.
Why You Should Check Your Mac System Performance Often
Your Mac is like a fast car. You wouldn’t drive it for 50,000 miles without checking the oil, tire pressure, or engine, would you? You would do regular maintenance to keep it running well and to find small problems before they turn into big ones that cause it to break down on the highway. Your Mac is the same way.
Checking the health of your Mac system on a regular basis is a proactive step that has a lot of benefits:
Prevent Catastrophic Failures: A process that keeps using up your CPU isn’t just slowing you down today; it’s also making your Mac hotter and causing wear and tear that could shorten its life. Catching it early stops damage from happening in the future.
Increase Productivity: A quick, responsive system lets you work without stopping. Cutting seconds off of each task adds up to hours of time saved and a lot less stress.
Improve Security: Sometimes, performance problems are caused by malware or adware running in the background. You can find processes that shouldn’t be there by keeping an eye on what your system is doing.
Make Your Work More Efficient: Knowing which apps use a lot of resources helps you make better decisions. It’s possible that having 80 tabs open in your browser isn’t a good idea, or that there’s a lighter version of a piece of software you use that is too big.
It’s not a hassle to check your Mac’s performance; it’s an investment in a digital life that runs more smoothly, faster, and lasts longer.
The first thing to do is check the performance of your Mac system with Activity Monitor.
The Activity Monitor is the dashboard for your Mac. This powerful utility that comes with your computer is the best place to start your search. You can see exactly what your computer is doing at any time in real time.
To open it, go to Applications > Utilities > Activity Monitor. The fastest way is to press Command + Spacebar to open Spotlight search, type “Activity Monitor,” and hit Enter.
When you open it, you’ll see five tabs. Let’s go over what they mean and how to use them to figure out what’s wrong.
What the CPU Tab Means
The CPU, or Central Processing Unit, is like the brain of your Mac. It follows orders and does the math that makes everything work. The CPU tab tells you how busy that brain is.
Important Columns to Keep an Eye On:
% CPU: This is the most important column. It shows how much CPU each process is using. When a healthy Mac is not doing anything, the kernel_task and WindowServer processes should be using a small amount of CPU, while most other processes should be using almost none. If you see a process using more than 80% or 90% of the CPU all the time, it’s probably the reason your computer is running slowly. People often call this a “runaway process.”
CPU Time: This tells you how long a process has been running on the CPU. It’s a good way to find out which part of your session has been working the hardest.
Idle Wake Ups: This tells you how many times a process has woken up the CPU from being idle. If an app is supposed to be in the background and has a lot of activity, it could be a problem, and it could also drain the battery on a MacBook.
Tip: If your Mac is running slowly, go to the CPU tab and click on the “% CPU” column header to sort processes by how much CPU they are using. Look at the top process for a minute. Are you using a certain app? Perhaps a browser tab with a lot of code?
Or a process that runs in the background, like “mds_stores” (Spotlight indexing)? You can force quit the resource hog by selecting it and clicking the “X” button at the top of the window once you know what it is. (Source: Apple Support – Activity Monitor)
Making the Memory Tab Clear
RAM, or random access memory, is the short-term memory of your Mac. It stores all the information for the apps and processes that are currently running. When your Mac runs out of RAM, it has to “swap” data to your main storage drive, which is a lot slower and makes your system stop working.
The Memory Pressure graph at the bottom is the most important thing to look at here.
Green: You’re all set. There is a lot of RAM on your Mac.
Yellow: Things are getting tight. Your Mac is starting to actively manage memory, which could make it feel a little slower.
Red: Houston, we have a problem. Your Mac doesn’t have enough RAM, so it’s relying on slow swap memory a lot. This is when you see the beach ball spinning and things take a long time to load.
Tip: If your Memory Pressure is yellow or red, you need to do something. To find out which apps are using the most RAM, sort the list by the Memory column, just like you did with the CPU tab. A lot of the time, your web browser is to blame, especially if you have a lot of tabs open.
If you don’t need them, close any apps and browser tabs. If you always see the red, it could mean that your Mac doesn’t have enough RAM for your workflow. If you have an older Mac that can be upgraded, this could mean it’s time to get new hardware. If you have a newer Mac with soldered RAM, this means you need to be more careful about how you manage open apps.
Looking at the Energy Tab
This tab is a godsend for people who use MacBooks. It tells you which apps and processes use the most power.
Important Columns to Keep an Eye On:
Energy Impact: A real-time score of how much power a process is using right now. More battery drain happens when the numbers are higher.
12 hr Power: This shows the average energy impact over the last 12 hours. It helps you figure out which apps are always draining your battery, even if their current impact is low.
App Nap: This column will say “Yes” for apps that macOS has put into a low-power state because they are open but hidden behind other windows. This is a good thing!
Tip: Check this tab before a long flight or a meeting where you won’t be able to charge your phone. Find the apps that have the biggest effect on your battery life and stop using them if you don’t need them. This quick check can easily give your battery an extra hour or more of life. (Interlink Idea: Check out our guide on [Maximizing Your MacBook’s Battery Life] for more tips.)
Looking into the Disk Tab
The Disk tab shows how much data each process is reading from and writing to your hard drive (SSD or HDD). Too much disk activity can slow down performance a lot, especially on older Macs with mechanical hard drives.
What to Look For: Processes that have a lot of “Bytes Written” or “Bytes Read” all the time. You might see “mds” or “mds_stores,” which is macOS’s Spotlight search indexing your files. This is normal after adding a lot of new files, but if it keeps happening, your Spotlight index might be broken.
Helpful Hint: If your Mac is running slowly and you hear the hard drive clicking (on older models), go to the Disk tab. If an app seems to be stuck in a loop of reading and writing data, quitting and restarting it can often fix the problem.
Keeping an Eye on the Network Tab
This tab shows how much data each process is sending and receiving over your network (Wi-Fi or Ethernet).
Helpful Hint: Is your internet connection slow for no apparent reason, but other devices on the network are fine? Look at this tab. A cloud backup service, like iCloud Drive, Dropbox, or Google Drive, might be uploading a big file, or a software update might be downloading in the background. It helps you figure out what is using up all of your bandwidth so you can stop the process and get back to browsing.
Checking storage: the silent performance killer
Available storage space is one of the most important but often ignored factors that affect Mac performance. Your macOS needs some free space to work well. This space is used for virtual memory (swap files, as we talked about earlier), temporary files, caches, and other tasks that the system needs to do.
As a general rule, you should always try to keep at least 15–20% of your total storage space free. When your drive is more than 90% full, it will slow down a lot, even if your CPU and RAM seem fine.
How to Check Your Storage Natively
Apple has made it very easy to check the storage on your Mac.
Click on the Apple menu in the upper left corner of your screen.
On newer versions of macOS, like Ventura and Sonoma, click on “System Settings…” or “About This Mac” on older versions.
In System Settings, go to General > Storage. Click the “Storage” tab in “About This Mac.”
A color-coded bar will show you what’s taking up space. It is divided into groups such as “Apps,” “Documents,” “Photos,” and the huge “System Data.”
Going Deeper: What does “System Data” mean?
“System Data” can be annoying because it’s a vague category that takes up a lot of space. It holds a lot of different files, such as:
Caches and support files for applications
Logs and Temporary Files
Old Time Machine snapshots saved on the computer
Files that the operating system itself uses
Archives and disk images
You can’t just delete this whole category, but you can make it smaller. (Interlink Idea: Check out our full guide on [How to Safely Clean Up ‘System Data’ on Your Mac].)
Useful Tips for Getting More Space
If you notice that your storage is getting low, here are some things you can do right now:
Attack the Downloads Folder: This is where installers, old PDFs, and images that are only used once often end up. Sort it by size and get rid of anything you don’t need.
Empty the Trash (and the Photos Trash!): It seems obvious, but a lot of people forget. Keep in mind that the Photos app has a “Recently Deleted” album that keeps deleted photos for 30 days. You can free up gigabytes by emptying both.
Uninstall Unused Applications: When you drag an app to the Trash, it often leaves behind preference files and caches. Think about using an uninstaller tool to make the removal cleaner. (Backlink: Good tools like AppCleaner are free and work well.)
Clear Caches Safely: You can clear caches by hand, but be careful. The user cache is a good place to start. To open Finder, click Go > Go to Folder… and type ~/Library/Caches. You can delete the files in these folders, but you can’t delete the folders themselves. After that, restart your Mac. Warning: Don’t ever delete anything from the main /System/Library folder.
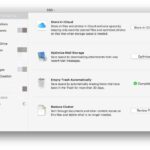
Use Apple’s Built-in Tools: Click the “Manage…” button in the Storage menu. Apple has great tools for “Store in iCloud,” “Optimize Storage” (which means getting rid of movies and TV shows you’ve already watched), and “Empty Trash Automatically.”
More advanced ways to check how well your Mac is working
Are you ready to use some more powerful tools to look under the hood? If you’re not afraid of using the command line, the Terminal gives you the best view of how well your Mac is working.
Using Terminal to Its Full Potential
To find the Terminal app, go to Applications > Utilities. This is a powerful interface, so always type commands exactly as they are shown.
Command 1: top
This is a text-based version of Activity Monitor that runs in the Terminal and shows you what’s happening right now. Just type “top” and hit Enter. It gives you a list of processes that is always up to date and sorted by how much CPU they use. It may look scary, but pay attention to the “PID” (Process ID), “COMMAND,” “%CPU,” and “MEM” columns. Just hit “q” to quit.
Command 2: fs_usage
This command lets you see all filesystem activity as it happens. It’s like the Disk tab in Activity Monitor, but better. You can use the command “sudo fs_usage [process_name]” to see exactly which files an app is reading or writing. For instance, “sudo fs_usage mds” will show you everything that Spotlight is doing. This is very helpful for diagnosing problems at a deep level.
Command 3: log show --last boot
Want to know what happens when your Mac starts up? This command will show you a huge log of all the processes that happened during the last boot. You can use grep to look for errors or long delays in this output, which will help you figure out why your computer is starting up slowly.
How to Use Console for Reports and Logs
The Console app (also found in Applications > Utilities) is a graphical user interface (GUI) for all the log files your Mac makes. The log command in Terminal is powerful, but Console is easier to use.
How to Use It: Start Console. You can see Crash Reports, Spin Reports (for when an app freezes), and Log Reports on the left. The main window has a live feed of system messages. You can search for the name of a specific app that keeps crashing in the search bar. You can search online or give the error messages you find to a developer for help. These messages can be very helpful.
Hardware Health Checks: More Than Just Software
Sometimes, hardware that isn’t working right is to blame for performance problems, not apps that are running out of control or not enough storage. This is how to check.
How to Run Apple Diagnostics
Apple Diagnostics, which used to be called Apple Hardware Test, is a built-in tool that checks the internal hardware parts of your Mac, such as the logic board, RAM, and graphics processor.
How to Do It:
If you have an Intel-based Mac, turn it off. Press and hold the D key right away after turning it on until you see the screen with the startup options.
For Macs with Apple Silicon: Turn off your Mac. Press and hold the power button until the window with the loading startup options opens. Then hold down the Command-D key.
The test will start on its own. If it finds any problems, it will give you a reference code that you can look up or give to Apple Support. (Source: Apple Support – Use Apple Diagnostics)
Checking the Health of the Battery
For people who use MacBooks, a bad battery can directly affect how well the computer works. When the battery is very low, macOS may slow down the CPU to save power and stop unexpected shutdowns.
How to Check: Click on the info icon ⓘ next to Battery Health in System Settings > Battery.
You can see the Maximum Capacity (how much power it can hold compared to when it was new) and the overall Battery Condition. If it says “Service Recommended,” the battery is very worn out. Not only will replacing it give you more time unplugged, but it can also bring your Mac back to its best performance.
Useful habits for keeping your Mac running fast all the time
The best way to deal with performance issues is to make sure they never happen in the first place. If you make these simple habits part of your daily life, your Mac will stay in good shape.
Habits of the Day
Quit, Don’t Just Close: When you click the red “X” on a window, you usually just close it. The application keeps running in the background. You should always quit apps you’re done with by pressing Command + Q or right-clicking the Dock icon and choosing “Quit.”
Control Your Browser Tabs: Each tab in your browser is a separate process that uses CPU and RAM. Instead of leaving a lot of tabs open as reminders, use bookmarks or a “read later” service like Pocket.
Keep Your Desktop Clean: Each icon on your desktop is a live window that uses resources. A messy desktop can make the Finder work more slowly and make your computer run more slowly. Put things in folders.
Habits for the Week
The Almighty Restart: There’s a reason why the old saying “turn it off and on again” works. When you restart your Mac, it deletes temporary files, clears the RAM, and stops any background processes that aren’t working. Restarting your computer once a week is a great way to keep it clean.
Check for Updates: Click on System Settings > General > Software Update. Apple often releases updates for macOS that fix bugs, improve performance, and add important security patches. You should also remember to update your apps from the App Store or directly from the developers.
Check Your Downloads Folder: Once a week, take a minute to go through your Downloads folder and get rid of any installers and files you don’t need anymore.
Monthly Routines
Check Your Storage: Once a month, take five minutes to check the storage on your Mac system using the steps we gave you above. This quick check makes sure you’re not getting close to the 90% full mark, which would slow down your performance.
Review Login Items: These are programs that start up automatically when you turn on your Mac. Too many can make your computer take a long time to start up. To stop apps from opening when you log in, go to System Settings > General > Login Items and take them off the list.
When to Get Professional Help
Even with all this information, some problems are too complicated or point to a bigger problem that needs a professional. If you need to go to the Genius Bar or an Apple Authorized Service Provider, it’s time to do so.
- Apple Diagnostics says that a piece of hardware is broken.
- You’ve done everything the software says to do to fix the problem, but it’s still there.
- The Mac won’t start up at all.
- You don’t want to do any of the harder steps, like using Terminal.
It’s okay to ask for help. The goal is to have a working Mac, and sometimes that means hiring a professional.
You Control How Well Your Mac Works
You don’t have to live with a slow Mac. As we’ve seen, you have a lot of powerful tools and methods at your disposal. You are now fully equipped, from the quick information provided by Activity Monitor to the in-depth diagnostics provided by Terminal, and from managing your storage to developing simple daily habits.
Being proactive is the key. Don’t let the spinning beachball become a permanent part of your screen. You can stop problems from happening by regularly taking a few minutes to check Mac system performance. You are making your valuable hardware last longer and, most importantly, making your work, your passion projects, and your digital life easier and more enjoyable.
Now, go ahead and open that Activity Monitor. Your Mac that runs faster is waiting for you.