
Hey, people who love technology and use laptops every day! Do you ever get the feeling that your reliable laptop is slowing down? Like it’s walking through treacle when you try to do more than one thing at once? You’re not the only one. Increasing the Random Access Memory (RAM) on your portable powerhouse is one of the best upgrades you can make to give it a new lease on life.
I’ve written a lot of articles about tech upgrades, and trust me, learning how to upgrade RAM on a laptop will change the game. It doesn’t sound as scary as it is. You can actually make your laptop work a lot better if you know what you’re doing and have the right tools.
We’ll go into great detail about the process in this complete guide. We’ll talk about everything from why RAM is important to how to upgrade RAM on a laptop step by step. I’ll also share some tips that I’ve learned over the years.
Why Does Your Laptop Need More RAM?
RAM is like your laptop’s short-term memory. It’s where your computer keeps data that it’s using right now so it can get to it quickly. Your laptop can run more programs and do more tasks at the same time without slowing down if it has more RAM.
Think about how hard it would be to juggle three balls instead of ten. Three should be enough for you. Things get crazy with ten, and you might drop some. That’s pretty much what happens when your laptop runs out of RAM. It starts to use the slower hard drive or SSD for temporary storage (a process called “paging” or “swapping”), which makes it noticeably slower.
You can get the following benefits by upgrading your laptop’s RAM:
- Faster multitasking: You can run more programs at the same time without any problems. * Better performance with demanding software: Video editing, photo editing, and gaming will all be much better.
- Faster boot times and application loading: Your laptop will start up and load programs faster. * Increased overall responsiveness: Your laptop will feel snappier and more efficient.
Can you upgrade the RAM in your laptop?
Before you get too excited about learning how to upgrade RAM on a laptop, the first thing you need to do is find out if your specific laptop model even lets you do that. Sadly, not all laptops are the same in this way.
A lot of today’s ultra-thin laptops and some 2-in-1 devices have their RAM soldered right onto the motherboard. This means it can’t be taken out or changed. But many popular laptops still have RAM slots that can be upgraded.
To see if your laptop’s RAM can be upgraded, do this:
Look at the Manual for Your Laptop: This is always the best thing to do first. The manual should give you all the information you need about your laptop, like whether the RAM can be upgraded and what kind of RAM it works with.
Look at the Manufacturer’s Website: Go to the support section of your laptop manufacturer’s website (for example, Dell, HP, Lenovo, or ASUS). Look up your model and see if you can find the specifications or a manual for keeping the hardware in good shape.
Check for compatibility with Crucial or Kingston: You can use tools on websites like Crucial and Kingston to find compatible RAM upgrades for your laptop. This is a good way to find out what your options are.
Physically Inspect Your Laptop (If Comfortable): If you’re okay with opening your laptop (always unplug it and ground yourself first!), you can look for RAM modules. They are usually small, rectangular sticks that fit into special slots. If you see these, it’s likely that you can upgrade your RAM. If you’re not sure, be careful and read your manual first.
Learning About Your Laptop’s RAM Specs
The next step in learning how to upgrade RAM on a laptop is to figure out what kind of RAM you need once you’ve confirmed that your laptop’s RAM can be upgraded. If you install RAM that doesn’t work with your laptop, it might not start up or have other problems.
Here are the most important RAM specs to keep in mind:
Type: DDR4 and DDR5 are the most common types right now. Some older laptops might still use DDR3 or even DDR2. Your new RAM modules have to be the same kind as what your laptop can use. You can usually find this information in the manual for your laptop or by using the compatibility checkers we talked about earlier.
Speed (MHz): RAM speed is measured in megahertz (MHz). You can usually install RAM with a higher speed, but it will only run at the speed that your laptop‘s motherboard can handle. It’s usually best to match the speed of your current RAM or pick the fastest speed your laptop can handle.
Form Factor: For laptops, the standard form factor for RAM is SO-DIMM (Small Outline Dual In-Line Memory Module). You shouldn’t buy DIMM modules, which are used in desktop computers. Instead, you should buy SO-DIMM modules.
Capacity: This is the amount of RAM on one module, which is usually measured in gigabytes (GB) (for example, 4GB, 8GB, 16GB, or 32GB). Find out how much RAM your laptop‘s motherboard can handle. Your laptop’s specs should have this information. You should also think about how many RAM slots your laptop has (usually one or two).
How to Upgrade RAM on a Laptop: A Step-by-Step Guide
Okay, let’s get to the practical part: how to add more RAM to a laptop. Here’s a step-by-step guide to help you get through the process:
Get Your Tools and Supplies Together:
Your new RAM modules. A Phillips head screwdriver that is small enough to fit the screws on your laptop.
A wrist strap that doesn’t let static electricity build up is very important to keep your laptop’s parts from getting damaged by electrostatic discharge (ESD). You can easily find these online or at stores that sell electronics.
A small box or magnetic mat to hold screws. The manual for your laptop (not required but helpful).
Turn off and unplug your laptop: Unplug the power adapter and turn off your laptop completely. Wait a few minutes to make sure all the extra power is gone.
Get Grounded: Put on your anti-static wrist strap and attach the other end to a metal part of your laptop’s chassis that isn’t painted (or another grounded metal object). This will stop ESD.
Get to the RAM Compartment: The RAM slots are in different places on different models of laptops. Some laptops have a special access panel on the bottom just for adding more RAM and storage. Some need the whole bottom panel to be taken off. Check your laptop‘s manual for the exact location and steps to take it out. Don’t push anything too hard; be gentle. You may have to take out a few small screws.
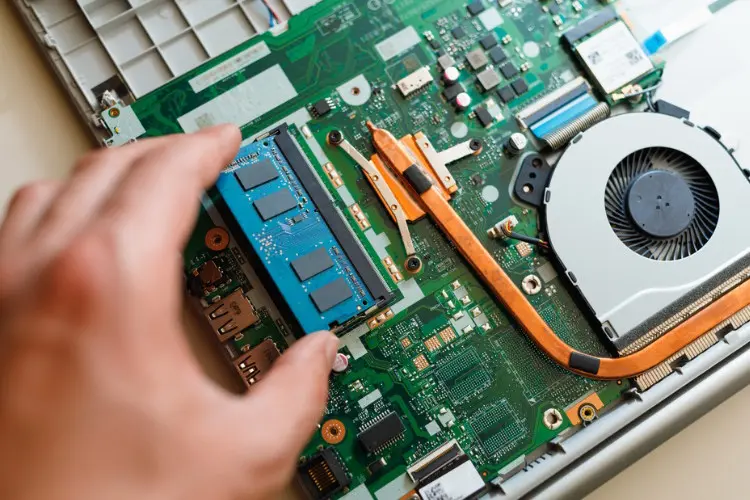
Find the Existing RAM Modules: Once you can get to them, you should see one or two RAM modules held in place by small clips or levers on either side of the slot.
Take Out the Old RAM Modules (If You’re Replacing Them): Lightly push the clips or levers outwards. Most of the time, this will make the RAM module pop up a little bit. To take the module out of the slot, carefully pull it out by the edges without touching the gold connectors. If you want to keep the old RAM modules, put them in an anti-static bag.
Put the new RAM modules in place: Make sure the notch on the new RAM module lines up with the notch in the RAM slot. Put the module in the slot at a slight angle (usually about 45 degrees). Then, press down firmly and evenly on both ends of the module until the side clips snap back into place. This will keep the RAM safe. You should hear a nice click. If you’re putting in a second module, do the same thing for the other slot.
Put Your Laptop Back Together: Carefully put the access panel or the whole bottom panel back on your laptop and use the screws you took out earlier to hold it in place. Tighten all the screws, but don’t go too far.
Turn on your laptop: Plug in the power adapter and turn on your laptop.
Check the New RAM: After your laptop starts up, you should check to see if it recognizes the new RAM.
Windows: To open Task Manager, press “Ctrl + Shift + Esc.” Find “Memory” under the “Performance” tab. It should show how much RAM is installed in total. You can also look for “System Information” in the Start Menu and click on the “Installed Physical Memory (RAM)” link.
macOS: In the top left corner, click the Apple menu and choose “About This Mac.” You can see the installed RAM under the “Overview” tab.
Well done! You’ve successfully learned how to Upgrade RAM on a Laptop, which should have made your computer run much faster.
Useful Advice and Things to Think About
Here are some useful tips and things to think about now that you know how to upgrade RAM on a laptop:
Always Work in a Clean and Well-Lit Area: This will help you see small parts better and keep screws from getting lost.
Take Pictures: If you’re not sure about something while you’re taking it apart, use your phone to take pictures. This can be helpful when putting things back together.
Don’t Push Anything: If a screw won’t move or a panel seems stuck, check again to see if you missed any steps or screws. Putting too much pressure on parts can break them.
Static Electricity is Your Enemy: Always wear a wrist strap that doesn’t cause static. Even a small amount of static electricity can damage delicate electronic parts.
Think about buying RAM in sets: If you’re upgrading both RAM slots, it’s usually best to buy RAM in a matched kit, which includes two modules with the same capacity and specs. This can make sure that dual-channel setups work at their best.
Think About Your Needs: How much RAM do you really need? 8GB might be enough for simple tasks like checking email and browsing the web. You might need 16GB or even 32GB for more demanding tasks like gaming or editing videos. Think about how you plan to use it when you choose the size. (Interlink to a future blog post about how to pick the right amount of RAM).
Keep Your Old RAM (Optional): If the old RAM still works, you can keep it as a backup or use it in another device that can use it.
Regular Maintenance is Important:** Upgrading your RAM is an important step, but don’t forget that other things, like updating your software, managing your startup programs, and cleaning out your hard drive every now and then, also affect how well your laptop works. (Backlink to an earlier blog post with tips on how to take care of your laptop).
Fixing Common Problems with RAM Upgrades
The process of how to upgrade RAM on a laptop is usually simple, but you may run into some common problems:
The laptop won’t turn on: Make sure that the RAM modules are in their slots correctly and that all the cables are firmly connected. Make sure you put the laptop back together right.
Laptop Turns On But Doesn’t Boot: This could mean that the RAM is not compatible. Make sure you’ve picked the right kind, speed, and size for your laptop. Put the old RAM back in and see if that fixes the problem.
Blue Screen Errors (Windows) or Kernel Panics (macOS): These can also mean that your RAM is not working right or is not compatible. Use a memory diagnostic tool like Windows Memory Diagnostic or Apple Diagnostics to look for problems.
Found Wrong Amount of RAM: If your computer isn’t recognizing all of the RAM you installed, make sure the modules are properly seated and that your operating system can handle the amount you installed (older 32-bit systems have limits). Also, look at your BIOS/UEFI settings.
If youchapters, your laptop’s manual or a qualified technician can help.
Conclusion: Make your laptop better today
One of the best ways to make your laptop faster and more responsive is to learn how to upgrade its RAM. It’s a relatively cheap upgrade that can really improve how you use your computer every day. You can give your old laptop a new lease on life by following this guide and taking your time. This will make it easier to multitask and speed up its performance. Don’t let a slow laptop stop you from getting the most out of it—go ahead and do it! (Connect to a product page for RAM that is related).
https://bigezwehotv.rw/category/trends